创建hexo博客

欢迎 来到 我 王国聪的博客!

前言

  • 周末用了不到一天时间搭建了属于自己的博客,欣喜之余,就将个人博客搭建的详细过程记录下来,分享给大家使用;
  • 搭建之前,笔者看过其他博客的搭建教程,上面都提到可以在短短几分钟搭建好自己的博客。
  • 从搭建到博客访问确实只需要几分钟的时间,但几分钟的工作并未达到我们的预期,需要优化的时间可不止几分钟。遗憾的是,那些教程并没有将博客优化过程可能遇到的坑提及出来。因此,本文有必要补充一下。

我这次搭建的博客是个人博客,因为服务器的选择以及便捷,所以我选择的是:GitHubPages + Hexo+Next

当然有很多实现方式:如:WordPress、GitHubPages + Jekell等等。

第一步:

创建Github仓库

  • 在浏览器输入Github网址;

  • 登录或者注册;

  • 点击下图所示的 New repository
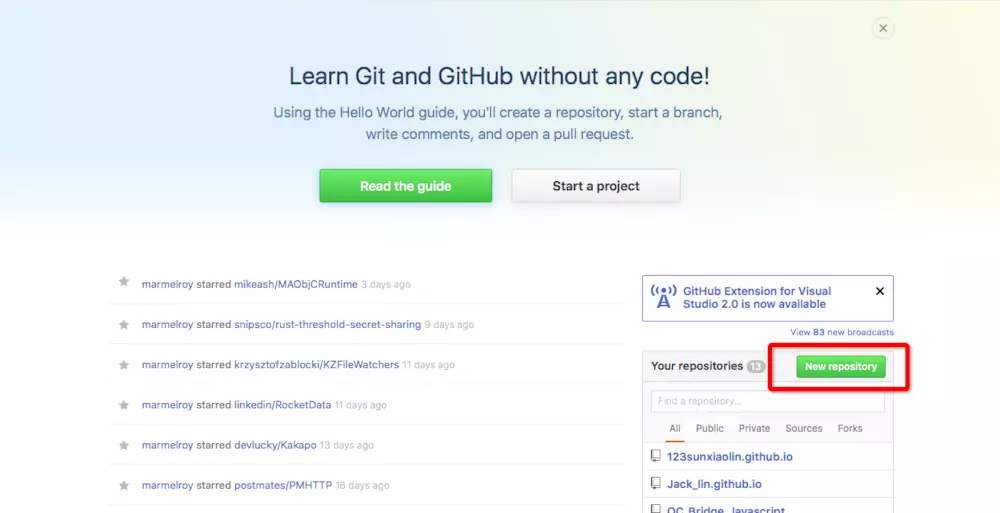
    github:

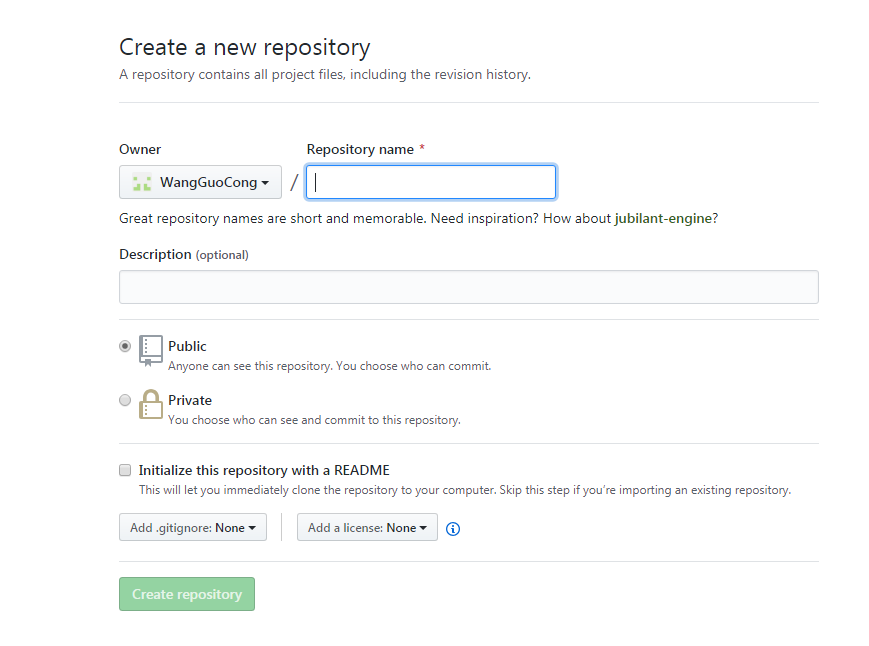
填写仓库名称:Respository name 中:xxx.github.io,然后点击”Create repository“ 按钮完成创建即可。(我尝试过在这填写过:不是用户名.github.io,最终的后果是显示404页面,建议使用:用户名.github.io)

具体如下图所示:

create_repository

本地环境的准备工作

Git安装和Nodejs安装

在这就先完成了github的工作,然后安装Git以及Nodejs (Nodejs也可使用Nodejs版本管理器nvm安装,考虑其安装过程中存在的问题较多,操作流程也多,我不推荐大家使用这种方式安装。此处就不列举其安装方式)

Hexo安装

打开Git Cmd终端,输入Hexo的安装命令:

1
npm install hexo-cli -g

若此命令安装不成功时,可输入下面的命令和开机密码继续完成安装:

1
sudo npm install hexo-cli -g

安装完成后,就定位到你希望存储博客的目录下,如图:

cmd

执行Hexo命令,初始化本地博客仓库:

1
hexo init xxx.github.io // 尽量和Github仓库使用同一个名称(避免一些意料之外的错误)
博客效果预览
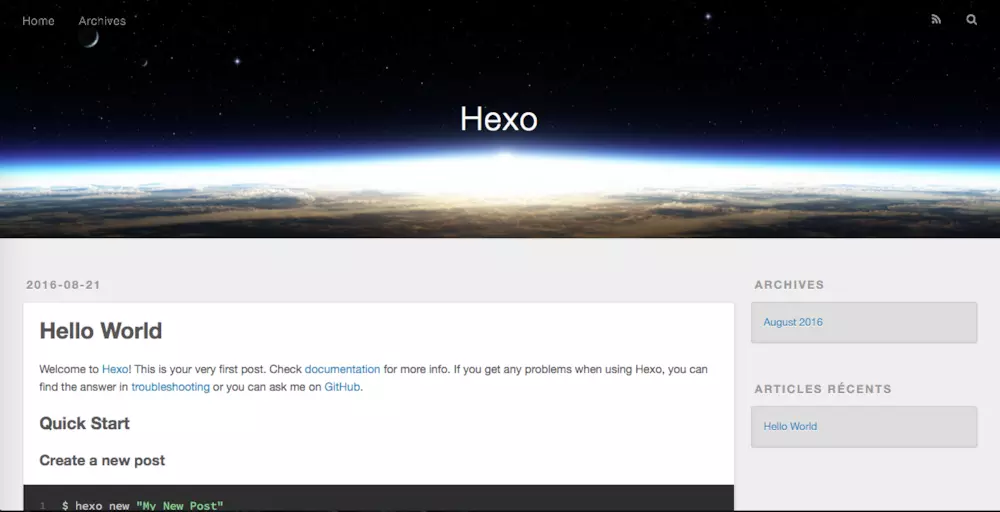
  • 上述步骤完成后,基本的博客框架就已经搭建完了,Hexo安装完成后默认使用landscape主题;
  • 在终端定位到xxx.github.io文件夹下,并在终端输入下面的命令就能启动服务预览功能;
1
hero s

cmd_2

在浏览器上输入网址:http://localhost:4000/,就能预览到landscape主题下的博客效果,具体如图:

hexo_landscape

这个主题是默认的主题你觉得很好的话就继续使用,我是用的是next主题,这里说下安装主题的方式:

一: 定位到对应博客的位置

二: 安装对应的主题(还有很多的好看的主题,可自行挑选,网址如下:https://hexo.io/themes/)

1
2
cd xxx.github.io
git clone https://github.com/iissnan/hexo-theme-next themes/next

然后就是我们的博客配置了:

注意说明下:有两个配置文件,一是站点配置文件(博客工程的主目录下),一个是主题配置文件(博客的themes目录下的对应主题目录下)

站点配置文件:打开之前的xxx.github.io文件夹,找到_config.yml即为站点配置文件,选中该文件->右击->打开方式->文本编辑(也可以选择Sublime打开),打开后就可以修改基本的博客配置了;(注意一下:在配置文件里‘#’就是注释符,相当于C语言中的‘//’)

这里附录我的config.yml,有魔改部分,请酌情参考

1
2
3
4
5
6
7
8
9
10
11
12
13
14
15
16
17
18
19
20
21
22
23
24
25
26
27
28
29
30
31
32
33
34
35
36
37
38
39
40
41
42
43
44
45
46
47
48
49
50
51
52
53
54
55
56
57
58
59
60
61
62
63
64
65
66
67
68
69
70
71
72
73
74
75
76
77
78
79
80
81
82
83
84
85
86
87
88
89
90
91
92
93
94
95
96
97
98
99
100
101
102
103
104
105
106
107
108
109
110
111
112
113
114
115
116
117
118
119
120
121
122
123
124
125
126
127
# Hexo Configuration
## Docs: https://hexo.io/docs/configuration.html
## Source: https://github.com/hexojs/hexo/

# Site
#站点名称
title: 欢迎来到王国聪的博客
#副标题
subtitle: 所有的为时已晚都是开始的最好时候
#个人描述
description:
keywords:
author: Wangguocong
language: zh-Hans
timezone:

# URL
## If your site is put in a subdirectory, set url as 'http://yoursite.com/child' and root as '/child/'
url: http://yoursite.com
root: /
permalink: :year/:month/:day/:title/
permalink_defaults:

# Directory
source_dir: source
public_dir: public
tag_dir: tags
archive_dir: archives
category_dir: categories
code_dir: downloads/code
i18n_dir: :lang
skip_render:

# Writing
new_post_name: :title.md # File name of new posts
default_layout: post
titlecase: false # Transform title into titlecase
external_link: true # Open external links in new tab
filename_case: 0
render_drafts: false
post_asset_folder: true
relative_link: false
future: true
highlight:
enable: true
line_number: true
auto_detect: false
tab_replace:

# Home page setting
# path: Root path for your blogs index page. (default = '')
# per_page: Posts displayed per page. (0 = disable pagination)
# order_by: Posts order. (Order by date descending by default)
index_generator:
path: ''
per_page: 10
order_by: -date

# Category & Tag
default_category: uncategorized
category_map:
tag_map:

# Date / Time format
## Hexo uses Moment.js to parse and display date
## You can customize the date format as defined in
## http://momentjs.com/docs/#/displaying/format/
date_format: YYYY-MM-DD
time_format: HH:mm:ss

# Pagination
## Set per_page to 0 to disable pagination
per_page: 10
pagination_dir: page

# Extensions
## Plugins: https://hexo.io/plugins/
## Themes: https://hexo.io/themes/
theme: next

# Deployment
## Docs: https://hexo.io/docs/deployment.html
deploy:
type: git
repository: https://github.com/WangGuoCong/wangguocong.github.io.git

# Live2D
## https://github.com/EYHN/hexo-helper-live2d
live2d:
enable: true
scriptFrom: jsdelivr
# 默认
pluginRootPath: live2dw/
# 插件在站点上的根目录(相对路径)
pluginJsPath: lib/
# 脚本文件相对与插件根目录路径
pluginModelPath: assets/
# 模型文件相对与插件根目录路径
# scriptFrom: jsdelivr # jsdelivr CDN
# scriptFrom: unpkg # unpkg CDN
# scriptFrom: https://cdn.jsdelivr.net/npm/live2d-widget@3.x/lib/L2Dwidget.min.js # 你的自定义 url
tagMode: false
# 标签模式, 是否仅替换 live2d tag标签而非插入到所有页面中
debug: false
# 调试, 是否在控制台输出日志
model:
use: live2d-widget-model-hijiki
# npm-module package name
# use: hijiki # 博客根目录/live2d_models/ 下的目录名
# use: ./wives/hijiki # 相对于博客根目录的路径
# use: https://cdn.jsdelivr.net/npm/live2d-widget-model-hijiki@1.0.5/assets/hijiki.model.json # 你的自定义 url
scale: 1
hHeadPos: 0.5
vHeadPos: 0.618
display:
superSample: 2
width: 125
height: 125
position: left
hOffset: 30
vOffset: -20
mobile:
show: true
scale: 0.05
react:
opacityDefault: 1
opacityOnHover: 0.2
  • 配置好站点配置文件,就可以预览一下博客的效果了,流程与前面的相同,即在终端定位到xxx.github.io文件夹,执行hexo s命令。
1
2
cd xxx.github.io
hexo s
博客的Next主题配置
  • 主题配置文件:需要与之前讲过的站点配置文件进行区分,站点配置文件xxx.github.io/_config.yml目录;主题配置文件xxx.github.io/themes/next/_config.yml目录下;
  • 关于主题可配置的选项略多,故采取分条讲解的形式,具体如下:
1、设置关键字
1
2
# Set default keywords (Use a comma to separate)
keywords: “Unity, 程序猿, 文艺小青年” #修改
2、设置博客的开始时间
1
2
# Specify the date when the site was setup
#since: 2019 #设置博客的开始时间
3、菜单栏的设置
1
2
3
4
5
6
7
8
9
10
11
# ------------------------------------------------        ---------------
# Menu Settings
# ---------------------------------------------------------------
# When running the site in a subdirectory (e.g. domain.tld/blog), remove the leading slash (/archives -> archives)
menu: #- 修改
home: / #在菜单上显示首页
archives: /archives //设置显示归档
categories: /categories // 设置显示分类
tags: /tags //设置显示标签
about: /about //设置显示关于
#commonweal: /404.html
4、菜单栏的图标设置:可从Font Awesome 网站查询图标对应的名称填入到对应的菜单项即可
1
2
3
4
5
6
7
8
9
10
#设置菜单的图标,规则为:菜单(左):图标名(右)
menu_icons:
enable: true
#KeyMapsToMenuItemKey: NameOfTheIconFromFontAwesome
home: home
about: user
categories: th
tags: tags
archives: archive
commonweal: heartbeat
5、设置博客的外观
1
2
3
4
# Schemes
#scheme: Muse #默认 Scheme,这是 NexT 最初的版本,黑白主调,大量留白
#scheme: Mist #Muse 的紧凑版本,整洁有序的单栏外观
scheme: Pisces #双栏 Scheme,当然也是我选择的
6、设置社交链接(设置了Github、微博)
1
2
3
4
5
6
7
8
9
10
11
12
13
14
15
16
17
18
19
20
21
22
 # Social Links
# Key is the link label showing to end users.
social:
GitHub: https://github.com/123sunxiaolin
Weibo: http://weibo.com/JacklinIOS/profile?rightmod=1&wvr=6&mod=personinfo
#JianShu: http://www.jianshu.com/users/ef991f6d241c/latest_articles
#设置社交链接对应的图标
social_icons:
enable: true
# Icon Mappings. - 修改
KeyMapsToSocalItemKey: NameOfTheIconFromFontAwesome
GitHub: github
Twitter: twitter
Weibo: weibo
#JianShu: heartbeat

# Blogrolls -设置友情链接
links_title: Links
#links_layout: block
#links_layout: inline
links:
Jack_lin简书:

head

7、设置侧栏的头像
1
2
3
4
 # Sidebar Avatar
# in theme directory(source/images): /images/avatar.jpg
# in site directory(source/uploads): /uploads/avatar.jpg
avatar: /images/avatar.jpg #修改 - 侧滑栏头像,可参考站点配置文件中关于头像的设置
  • 注意一点使用next主题时,侧栏头像只能存储在主题目录下images文件夹里
8、设置侧栏的方向(设置成左侧)
1
2
3
4
sidebar:
# Sidebar Position, available value: left | right
position: left
#position: right
9、设置博客中代码高亮显示
1
2
3
4
5
6
7
# Code Highlight theme
# Available value:
# normal | night | night eighties | night blue | night bright
# https://github.com/chriskempson/tomorrow-theme
# highlight_theme: normal
# 代码高亮主题
highlight_theme: night eighties
10、设置微信支付宝赞赏功能
1
2
3
4
5
6
7
# 打赏配置
# 打赏说明文本
reward_comment: 坚持原创技术分享,您的支持将鼓励我继续创作!
# 微信收款二维码
wechatpay: /uploads/images/wechat-reward-image.png
# 支付宝收款二维码
alipay: /uploads/images/alipay-reward-image.png

dashang

创建分类界面
  • 打开终端,定位到xxx.github.io目录下;

  • 执行下面的命令,新建一个名为categories的页面;

    1
    hexo new page categories
  • 创建完成后,在对应的目录下找到index.md文件,进行如下的修改:

    1
    2
    3
    4
    5
    6
    ---
    title: categories
    date: 2019-02-25 22:17:49
    type: "categories" # 将页面的类型设置为 categories,主题将自动为这个页面显示所有分类
    comments: false
    ---
创建标签界面
  • 打开终端,定位到xxx.github.io目录下;
  • 执行下面的命令,新建一个名为tags的页面;
1
hexo new page tags
  • 创建完成后,在对应的目录下找到index.md文件,进行如下的修改:

    1
    2
    3
    4
    5
    6
    ---
    title: tags
    date: 2019-02-25 22:17:49
    type: "tags" # 将页面的类型设置为 tags,主题将自动为这个页面显示为标签云
    comments: false
    ---
  • 上述创建的分类和标签界面是主题自动维护的,用户只需要按照规则书写文章即可。

到这里,基本完成了简单的博客创建,再说下怎么创建和发布博客:

如何写和发布博客
  • 主要使用的Markdown语法写文章,推荐Mac上使用Mou编辑软件,windows上使用Typora编辑软件,都可带查看其语法帮助;

  • 在文章开头需要添加一些配置,如下:

    1
    2
    3
    4
    5
    6
    7
    8
    9
    ---
    title: 个人博客搭建详解(Windows和Mac通用版) # 这是标题
    categories: # 这里写的分类会自动汇集到 categories 页面上,分类可以多级
    - 博客站教程
    - 个人博客书写
    tags: # 这里写的标签会自动汇集到 tags 页面上
    - 专业
    - 自由
    ---
  • 添加好上述配置后,就可以安心写文章了。最后,将写好的文章放到xxx.github.io/source/_post目录下

然后,就可在本地进行测试。

在终端上定位到xxx.github.io目录下,执行 hexo s命令,后在浏览器输入http://localhost:4000/即可看到博客的效果。

  • 可在终端输入下面的命令完成安装自动部署发布工具:
1
sudo npm install hexo-deployer-git --save
  • 发布到GithubPages

当在本地确认博客效果后,就可以将md文件生成静态网页上传至GithubPages,在终端定位到xxx.github.io目录下,执行下面的命令即可:

hexo clean #清楚网页缓存
hexo g #生成静态网页
hexo d #开始部署
//当然也可以使用一次性命令:
hexo clean && hexo g && hexo d

注意:首次部署时,终端会让你输入Github的用户名和密码(输入密码的时候是不显示出来的,所以盲打,输入,点击回车确定就行),按照要求填写后,稍等几分钟,就可以完后部署。

最后一步
  • 在浏览器上输入http://xxx.github.io就可以看到属于你的博客了。是不是很激动,那就赶紧行动吧!

后记:

这只是初级的创建hexo博客,还有很多的进阶,这里我附录下我看到的有用的教程,以及有些hexo错误的解决办法:

*错误解决方案**

https://xuanwo.io/2014/08/14/hexo-usual-problem/#%E6%9C%AC%E5%9C%B0%E6%B5%8F%E8%A7%88%E6%B2%A1%E9%97%AE%E9%A2%98%EF%BC%8CDeploy%E6%8A%A5%E9%94%99

教程:

Hexo博客中插入音乐/视频/:

https://www.jianshu.com/p/26a7fc7cc185

hexo中完美插入本地图片:

http://etrd.org/2017/01/23/hexo%E4%B8%AD%E5%AE%8C%E7%BE%8E%E6%8F%92%E5%85%A5%E6%9C%AC%E5%9C%B0%E5%9B%BE%E7%89%87/

用Live2D让看板喵入住你的Hexo博客吧(^o^)/~:

https://11.tt/posts/2018/how-to-play-with-live2d-on-hexo/

使用Valine.js评论系统让游客们到你的Hexo博客留个脚印吧:

https://11.tt/posts/2018/add-valine-to-your-blog/

打造个性超赞博客Hexo+NexT+GitHubPages的超深度优化:

https://reuixiy.github.io/technology/computer/computer-aided-art/2017/06/09/hexo-next-optimization.html#%E9%99%84%E4%B8%8A%E6%88%91%E7%9A%84-custom-styl

hexo的next主题个性化教程:打造炫酷网站:(这个有33种优化)

http://shenzekun.cn/hexo%E7%9A%84next%E4%B8%BB%E9%A2%98%E4%B8%AA%E6%80%A7%E5%8C%96%E9%85%8D%E7%BD%AE%E6%95%99%E7%A8%8B.html

坚持原创技术分享,您的支持将鼓励我继续创作